


.png?width=60&height=60&name=AI%20Copilot%20logo%20(mega%20menu).png)


.png)
If you have ever started a self-service bot project, you might have hit this roadblock: Your bot is great and now you “just” want to embed it into your website.
This means facing the websites gatekeepers: Marketing, Corporate Comms and the Web teams have design standards and you will quickly learn that “…but I can adopt the colors & logo to our guidelines…” just won´t cut it. That is where the majority of the webchats on the market will fail and expensive non-planned development will start.
Cognigy already provides quite a number of options for our webchat widget, but with release 2.9.0 we have increased it to nearly 30 different parameters to tweak:
- Widget Colors
- Fonts & Font Colors,
- Buttons
- Input & Output style
- Avatars
- …and much more
Here a quick tech overview:
We provide you two options to support your requirements:
- CCS file
- <style> tags within the html file
There are just a few steps to take for making your webchat look like an alien space shuttle conversation tool. E.g.
Our tutorial below will walk through all the steps you need to get the result shown above.
- Download the Webchat Repository from GitHub:
git clone https://github.com/Cognigy/WebchatWidget.git custom-webchat - Navigate to the custom-webchat folder and install all of the required packages:
cd custom-webchat/ && npm i
Now you are ready to start the default webchat and talk to the example bot:
- npm run dev
This starts a development server on your computer, which you can launch by opening the following address in your browser: http://localhost:8080
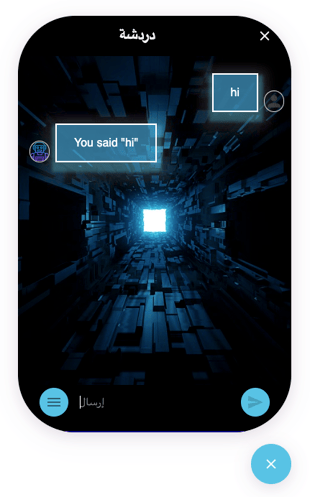
After clicking on the button on the right bottom corner of your screen, you should see the following. You can type in something like “hi” to test the bot:
Error! Filename not specified.
The webchat’s widget documentation gives a good overview on what CSS classes you can change: https://github.com/Cognigy/WebchatWidget/tree/master/src/webchat-ui
For this tutorial, use the example provided at the bottom of the documentation, which looks similar to this:
<style>
[data-cognigy-webchat-root].webchat-root {}
[data-cognigy-webchat-root] [data-cognigy webchat].webchat {
animation: grow 0.5s;
border-radius: 80px;
}
@keyframes grow {
0% {
height: 5.8px;
}
100% {
height: 580px;
}
}
…
</style>
Once you create a style tag and insert the example code in it and reload the page, you should see the result shown at the beginning of this blog post. If you still need anything else feel free to contact us.
Take a look at our tutorial, how to customize a Cognigy Webchat.

PS: If you got excited about using the webchat, you should also check out our blot post on webchat plugins. It takes the simple webchat to a whole new level.
https://hello.cognigy.com/news/create-amazing-chatbot-ux-with-webchat-plugins


